TL;DR: how to encrypt files in pCloud using the free rclone tool to boost privacy and security, and how to access them in Windows like a regular drive.
Big Brother can’t see – how to hide your file content from Microsoft, Google, and others in their own cloud
Added:
If you care about privacy, you probably pay attention to the services you choose and the reputation of those who hold your data.
I keep almost everything in the cloud. It protects me – if something happens to my hardware, I always have a backup. I also have access to my data from anywhere.
The problem starts when you want to store files in the cloud that you don’t want Google or Microsoft to see. This is especially true now, with news that our private files are being scanned to train so-called AI (and personally, I don’t rely on provider claims).
What it’s about and who it’s for
Here is the thing: you can use Google Drive, OneDrive, pCloud, or whatever service you prefer (as long as rclone supports it) – and upload your files there. Even if someone had your login and password for these services, they wouldn’t see the content of your files1.
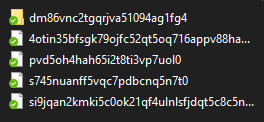
Why? Because you can encrypt them. It is relatively easy and free.
I will show you how to do this on Windows (rclone also works on macOS and Linux). I have tried this with OneDrive and pCloud, and it worked flawlessly. It is possible on Google Drive, but the setup is more complex. I would like to recommend Proton Drive, but unfortunately, it is currently unstable with rclone.
The text interface might seem intimidating. Don’t worry :) You don’t need to be a “computer expert” – this isn’t hacking. We will just be picking options and pasting ready-made commands. It’s just a window with text. We will only use it for a moment; it’s very easy.
Install rclone
To encrypt and decrypt files, we need rclone. Download it from: https://rclone.org/downloads/ (if you are on Windows, you will most likely need the Intel/AMD - 64 Bit version.)
Extract the downloaded file and move the entire folder to a location of your choice on your drive (I put mine in C:\rclone). I suggest renaming the folder to something shorter than the default (e.g. just “rclone”).
Install WinFsp
We also need WinFsp to mount the drive in Windows.
Download it here and install it: https://winfsp.dev/rel/
Step-by-step configuration – connect rclone to your cloud
- Create a folder on your cloud drive where your encrypted data will live. You can name it whatever you want. For this example, I’ll call it “Vault”.
We will create two configurations:
- The first connects rclone to your cloud.
- The second creates a “vault” – an encrypted version of that folder.
- Launch Command Prompt (normally, not as administrator). To do this, open the Start Menu and type
cmd. Open it. - Copy and paste:
path\to\rclone.exe config(in my case:C:\rclone\rclone.exe config). A wizard will appear with several options, as shown in the image below:
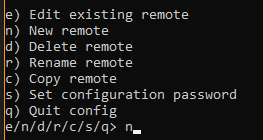
Look at the option name, not the number. Numbers might change in newer versions of rclone.
- Type
nfor theNew remoteoption and press Enter. - Choose a name. It can be anything. It’s important to remember it and use it consistently later. I simply named mine
pcloud. - Now you need to choose your cloud provider. Find yours on the list, type its number, and confirm.
- Next, rclone will ask for
client_idandclient_secret– you can leave these blank. Press Enter to continue.
Note: If your pCloud account is in the EU region, you need to change one more option. When rclone asks about advanced configuration, choose y (Yes).
Then it will ask many questions. Leave everything as default – don’t type anything and just press Enter until you reach the Option hostname question. There, select:
EU region / eapi.pcloud.com
Leave the rest as default again. When you return to the advanced configuration question, choose n (No) to continue.
- Finally, there is the browser authorization. A website will open automatically where you need to log in and allow rclone access.
At the end, confirm, and your remote is configured.
You can also double-check if everything is working by typing: path\to\rclone.exe lsd remote-name:
Set up the encrypted folder
Assuming you haven’t closed the Command Prompt, just repeat steps 4 through 6.
However, in step 5, give it a different name (I used pcloud-encrypted). In step 6, instead of choosing your cloud provider, select the Encrypt/Decrypt a remote / (crypt) option.
- Rclone will then ask for the path to the folder. Type the name of the remote followed by a colon and the folder path. In my case:
pcloud:Vault(since theVaultfolder is in the root directory of the cloud). - Choose to encrypt file names.
- Do the same for folder names.
- Rclone will now ask for a password to encrypt your data. You can enter your own or generate one. I chose to generate it. This will be a long password, so don’t worry about memorizing it – just make sure to save it.
- Then it will ask how strong the password should be. I chose the recommended 128 bits, so I typed
128and confirmed. - Save the password in a safe place – this is critical. You can keep it in a password manager (like Bitwarden). You will need it if you set this up on another computer. Without this password, you cannot recover your data.
- Once you have saved the password, confirm that you want to use it.
- You can skip
Password2; it is optional. - You don’t need to enter the advanced configuration. Finally, confirm that the configuration is OK.
Almost there! :)
How to run it? Mount the folder as a drive in Windows
To make everything work (uploading, encrypting, and reading), it’s best to create a file that will launch the process. Create a file with the .bat extension (e.g. mount_rclone.bat)2.
Open it in a text editor and paste the following code:
@echo off
rem Delay to ensure network is ready
timeout /t 10 /nobreak >nul

rem Set paths to rclone and configuration
set RCLONE=C:\rclone\rclone.exe
set CONF=%APPDATA%\rclone\rclone.conf
set CACHE=C:\rclone\cache\pcloud
set LOG=C:\rclone\logs\pcloud-mount.log

rem Create necessary directories
mkdir "C:\rclone\logs" 2>nul
mkdir "%CACHE%" 2>nul

rem Mount the encrypted remote as drive X:
"%RCLONE%" mount pcloud-encrypted: X: ^
  --config "%CONF%" ^
  --cache-dir "%CACHE%" ^
  --vfs-cache-mode writes ^
  --vfs-cache-max-size 2G ^
  --vfs-read-ahead 64M ^
  --no-modtime ^
  --log-level INFO ^
  --log-file "%LOG%"
You only need to replace:
- The paths to rclone (
set RCLONE,set CACHE,set LOG) – based on where you extracted rclone at the beginning. - And the name you gave your
cryptconfiguration. Specifically, change:pcloud-encrypted: X:, whereX:is the drive letter that will be mounted (this is how you will see the drive in File Explorer).
Save the file.
The rest are parameters we won’t dive into for now; they should work fine for you to start with.
Manual launch
Click your .bat file. After a moment, a new drive X: (or whatever letter you chose) should appear in File Explorer. This is actually the decrypted view of our encrypted folder.
Anything you paste there will be encrypted and sent to the cloud. You can check: paste a file and try accessing your cloud drive normally – you will see files and folders with strange names.
While doing this, the window that popped up after running the .bat file must remain open. If you close it, drive X: will disappear.
(Optional) Auto-start after login
You might want this to run all the time, rather than launching the .bat file manually. This can be done through Task Scheduler.
Open Task Scheduler (easiest way: Start Menu → type “Task Scheduler”). Then create a new task by selecting Create Task... on the right side:
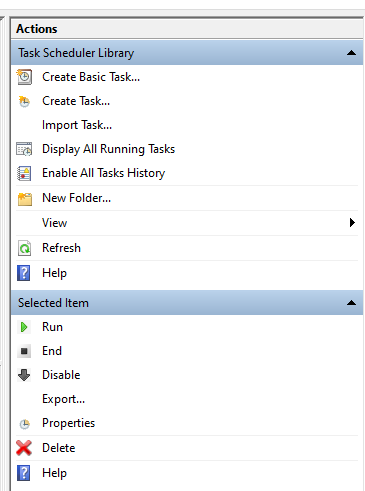
- On the first tab, enter any name for the task.
- Make sure the task is set to run only when the user is logged on.
- Check the box to make the task hidden.
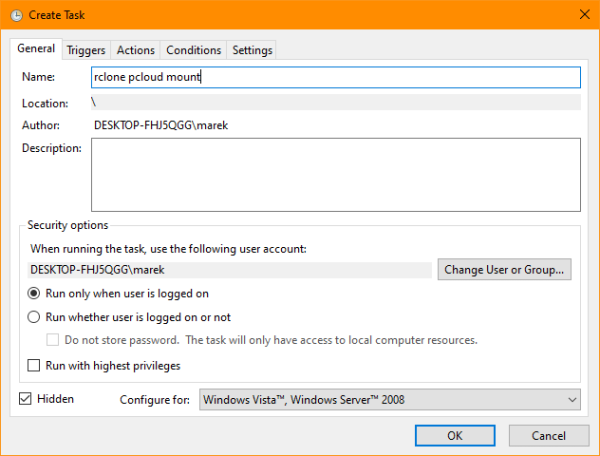
- Go to the second tab and set a trigger – click the button to create a new one.
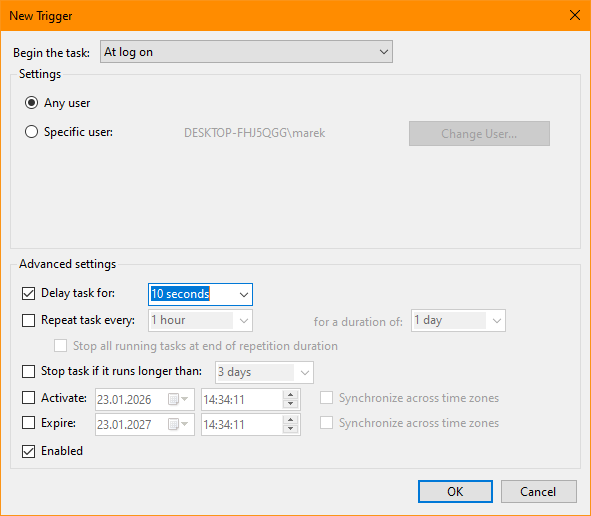
- Set the trigger to start the task at log on.
- Set a delay, such as 10 seconds, so it doesn’t start immediately.
-
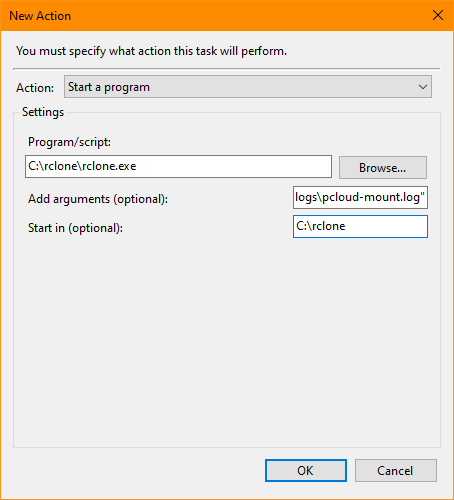
Confirm and go to the third tab, “Actions”. For the program/script, enter:
powershell.exe -
In the arguments field, paste the following in a single line (remember to replace the paths and names with your own):
-NoProfile -WindowStyle Hidden -Command "$conf=Join-Path $env:APPDATA 'rclone\rclone.conf'; New-Item -ItemType Directory -Force -Path 'C:\rclone\logs','C:\rclone\cache\pcloud' | Out-Null; $args=@('mount','pcloud-encrypted:','X:','--vfs-cache-mode','writes','--vfs-cache-max-size','2G','--vfs-read-ahead','64M','--no-modtime','--config',$conf,'--cache-dir','C:\rclone\cache\pcloud','--log-level','INFO','--log-file','C:\rclone\logs\pcloud-mount.log'); Start-Process -WindowStyle Hidden -FilePath 'C:\rclone\rclone.exe' -ArgumentList $args" -
Set the “Start in” field to the main rclone folder (in my case:
C:\rclone).
Without these arguments, a console window would pop up and have to stay open in the background for everything to work.
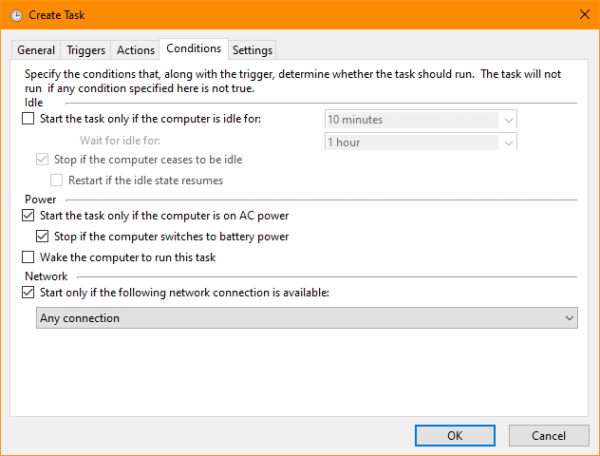
- Confirm and go to the “Conditions” tab. Check the box to start the task only when a specific Wi-Fi connection is available (you can pick a specific network or leave it as “Any network”). This is just a precaution to ensure it doesn’t try to start without an internet connection.
Phew. That’s all there is to it. Congratulations, you made it to the end! Now click OK and save everything. The next time you start your computer, the encrypted folder will mount in the background as a drive.
Cons and limitations
This solution, like any other, has its downsides:
- You aren’t as flexible on a smartphone. There are ways to make rclone work on mobile, but I won’t cover them here.
- Some cloud apps won’t show that something is uploading or has been deleted. For example, OneDrive shows this, but pCloud does not.
- Higher disk usage – the cache can eat up valuable space if you don’t have much to spare.
- It works best with a stable internet connection.
- File conflicts may occur if you edit the same file on multiple devices at the same time.
- There are longer delays than when reading files normally from the cloud.
PS: Protect your %APPDATA%\rclone\rclone.conf file because it contains access tokens and keys. It is not a vault.
Summary
You can keep your files in a regular cloud (OneDrive, pCloud, etc.) without letting anyone peek at their content – not even the provider. We do this by having rclone encrypt files on your end. The cloud only receives “gibberish” – strange names and unreadable content. In Windows, you see it as a normal drive (e.g. X:), so you use it just like a regular folder.
The most important thing is to save your encryption password and never lose it. Without it, you cannot recover your data. Other than that, you just move files as usual, but your privacy stays in your hands :)